Monday, 13 April 2020

Block models [1.14.4+]

The models for blocks (SimpleBakedModel) are made up of BakedQuads.
Each quad is stored with a number of properties that can affect the way it is drawn:

  • Facing direction (up, down, east, west, north, south) which is used to calculate ambient occlusion lighting effects
  • A “diffuse lighting” flag: true if the quad changes brightness depending on which way it is facing.  Note – do not confuse this with the “diffuselighting” render mode used by items.  The concept is the same, but the implementation is different: item diffuse lighting is implemented by the renderer using vertex normals, whereas block diffuse lighting is implemented in code using the facing direction, not using vertex normals.
  • A TextureAtlasSprite, which is the texture used to draw the quad
  • A tintindex, which asks BlockColors for a colour – typically a function which calculates colour based on eg temperature and rainfall for foliage, or the POWER blockstate property for redstone.  Failing that it falls back to BlockState.getMaterialColor()

The BakedModel also has further information about how to draw quads:
  • It divides Quads into two types:
    Face quads, which occupy one of the outer edges of the 1x1x1 cube and are not drawn if the adjacent cube is fully opaque (because the face quad would be invisible).
    General quads, which are always rendered
  • Ambient occlusion flag (if false, ambient occlusion is not used for this model)


The BakedModel properties are set from the json files for BlockModels which have the following flags:

  • ambientocclusion: controls the ambient occlusion flag
  • tintindex: 
  • shade: controls the “diffuse lighting” flag

Interesting Vanilla classes to explore:

SimpleBakedModel
BakedQuad
OBJModel
BlockModelRenderer
BlockRendererDispatcher

Further Information

Wiki on Block Models
Lighting

Block Rendering [1.14.4+]

There are a few key points in understanding how block rendering works:
  1. When minecraft is rendering a landscape, it first needs to ‘compile’ the block information (location, appearance, etc) into a list of drawing instructions that the graphics engine can execute.  Typically this means iterating through each block that the player might see and converting each part of the block into a series of textured rectangles.  A simple cube block like stone has six squares, one for each face.  More complicated blocks such as a torch or a piston are made up of a larger number of rectangular faces, perhaps at different angles.  After the render compilation phase is complete, minecraft ends up with a list of rendering instructions (a list of vertices with colour, texture coordinate, and lighting information) that can be executed by the graphics engine to draw the blocks in the landscape.
  2. Most of the blocks in a landscape are static, i.e. they don’t change their shape or position over time.  This allows minecraft to pre-compile a list of rendering instructions for drawing the blocks and then get the graphics engine to execute the list repeatedly, once per frame.  This is much faster than compiling the rendering instructions from scratch every frame.  In general, the drawing instructions only need to be recompiled when blocks in the landscape change.
  3. The blocks in a landscape are rendered in four different ways, depending on their desired appearance (see Picture below).  These are
  • SOLID – fully opaque (i.e. all texels render as opaque, ignoring alpha value).
  • CUTOUT_MIPPED – (alpha testing) - these block textures have holes in them (each texel is either fully opaque or fully transparent) and mip mapping is turned on (mip mapping is a way to improve the appearance of textures – see google for more information).
  • CUTOUT – (alpha testing) – as per CUTOUT_MIPPED except that mip mapping is turned off.
  • TRANSLUCENT – (alpha blending) – these blocks are partially transparent so that you can see other blocks through them – for example ice.  If the fancy graphics option is turned off, these become opaque.  TRANSLUCENT blocks are relatively expensive to render because they have to be pre-sorted in order of their distance from the player, otherwise they won’t render correctly.  TRANSLUCENT blocks can have holes in the texture same as for CUTOUT blocks, i.e. alpha testing is still turned on.

There are four main different "layers" of Block Rendering.  The difference between CUTOUT and CUTOUT_MIPPED is too subtle to show here.

A landscape of blocks is rendered in layers – eg all of the SOLID blocks are drawn first, then the CUTOUT_MIPPED, then the CUTOUT, then the TRANSLUCENT.  A given block will only render in one of the four layers.

Each block also has a render type, specified by BlockRenderType.  This selects the code used to draw the block.
  • MODEL = renders using an IBakedModel.  Each block model is made up of a collection of faces (quads), each of which points in one of the six cardinal directions (i.e. up, down, west, east, north, south).  Vanilla BlockModels are defined in json.  BlockModels are not animated (i.e. their shape does not change) although the texture on each face can be animated (for example like water or lava).
  • INVISIBLE (TESR) = Rendered using a TileEntityRenderer: This is used for blocks which move, change shape, or have an unusual appearance (for example Chest with opening lid, Pistons, Beacons, Signs).
  • ENTITYBLOCK_ANIMATED = inbuilt vanilla renderer

TileEntityRenderers are rendered at a separate time to blocks.  Unlike blocks, which use pre-compiled rendering instructions that are only updated when the landscape changes, TileEntityRenderers do not pre-compile their rendering instructions and are called every frame.

Vanilla classes of interest:

WorldRenderer::updateCameraAndRender
BlockRenderType
BlockModelRenderer

Further information:


Friday, 3 April 2020

Containers [1.14.4+]

To skip straight to sample code for containers, see here (MBE30, MBE31).

A number of advanced blocks use "containers" - these are blocks that can store items, including


  • Chests (permanent storage)
  • Furnaces (permanent storage)
  • Crafting table (temporary storage only)


The logic for containers can be quite confusing until you understand how they are structured.

Key points

  • A Container is used to bundle together different “Slots” into a single location.  Each Slot contains an ItemStack.  The Container may also contain other information, eg progress bar time.  For example, the FurnaceContainer collates information from the FurnaceTileEntity and the PlayerInventory.  It provides a consecutive list of Slots numbered from 0 .. N-1, where (eg) 0..35 might come from the player inventory, and 36 - 44 might come from the TileEntity.  It also tracks the smelting progress as an int.
  • Containers don’t permanently store information.  They are created, exist for a short time, then disappear.  Any items permanently stored in the “container” are actually stored elsewhere (usually – in the TileEntity).
  • Two Containers are created, one on the server and one on the client.  Vanilla will keep the slots in synch for you automatically, but extra information (eg progress bar information) you will need to synchronise yourself.
  • These two containers are created in two different ways:
  1. The server Container is constructed by a NamedContainerProvider::createMenu(), which is usually a TileEntity that implements the interface.  The NCP gives the container a link to its “permanent storage” inventory of items, which allows the container to alter the permanently stored items in the TileEntity.  In vanilla, this link is via the IInventory interface.
  2. The client Container is constructed (in response to a packet from the server) by using the registered ContainerType::create() method, which gives the container a link to an empty/temporary inventory instead of to a TileEntity’s “permanent storage”.
  • In addition to the client container, the client also has a ContainerScreen, which is the visual representation of the container.  It specifies the layout of the GUI, retrieves items and other data (eg progress bars) for display, and interacts with the user.  The basic element of the Screen is a number of "Slots" where items can be placed, you can add other graphic elements as desired.  The Screen only ever exists on the client, and is created by the registered IScreenFactory for that ContainerType.
Note that vanilla uses a few slightly different Interfaces and methods to implement Containers than Forge does, the most significant for TileEntities is
  • PlayerEntity::openContainer  instead of NetworkHooks::openGUI 

You can use the Vanilla methods if you prefer to do so, although the Forge methods are slightly more convenient / flexible.

It is not essential to use TileEntities as the NamedContainerProvider.  Blocks without TileEntities (eg CraftingTableBlock), an Entity (similar to the player's inventory), or even an Itemstack (eg using Capability) can be used instead.

Screen representation of a Container


Information flow involved with Containers

Creation/initialisation sequence for Containers


Sunday, 22 March 2020

Thread safety with network messages [1.14.4+]

Networking is performed in its own thread.  This means that your MessageHandler needs to be very careful not to access and client-side or server-side objects while it is running in its own thread.

For a brief background on multithreaded applications and their perils, see here.  The short summary is-  if your MessageHandler accesses any client-side or server-side objects, for example World or Minecraft, it will introduce a type of bug called a "race condition" which will lead to random crashes and strange, intermittent bugs and weirdness.

The way to overcome this problem is illustrated in the diagram below.  The essential features are:


  1. When your message arrives and your myMessageHandler.onMessageReceived() is called, you should create a lambda function and add it to a queue of tasks.
  2. It will look something like this:
    public static void onMessageReceived(final AirstrikeMessageToServer message, Supplier<NetworkEvent.Context> ctxSupplier) {
      ctx.enqueueWork(() -> processMessage(message, sendingPlayer));
    }
  3. After adding the lambda to the queue, your handler onMessageReceived() should return.
  4. Later on, the MinecraftServer tick will take your lambda function  off the queue and execute it  in the Server thread, which for this example will call myMessageHandler.processMessage(message, sendingPlayer).
  5. Because your message handler is now running in the server thread, it can call any server-side code it wants.

The protocol for messages sent to the client works in the same way.

For a working example of client and server messages, see here (example 60).


Some notes on the vanilla thread-safety code

The vanilla code uses the same basic strategy as outlined above, with a couple of differences

  • After queuing up the Future task, it uses a ThreadQuickExitException to abort further processing in the Netty thread.  Java coding experts generally regard this as a misuse of Exceptions, which are supposed to be for exceptional conditions only, not routine flow.  It was probably implemented this way to save some programming effort which was presumably in short supply at the time.  The proper way is to have one method for queuing the Runnable task, and a second method for processing the message on the client/server thread; the vanilla method uses the same method for both threads.
  • You will also notice the vanilla code uses thread.isOnExecutionThread().  This is only necessary because of the ThreadQuickExitException.  You don't need it, because unlike vanilla your handler.onMessage() will always be running in the Netty thread and your handler.processMessage() will always be running in the client / server thread.

Anyway the short summary is - ignore the vanilla PacketThreadUtil.checkThreadAndEnqueue(), it is not good programming style.


Client<-->Server communication using your own custom messages (SimpleChannel) [1.14.4+]

Although vanilla uses ClientPlayNetHandler and ServerPlayNetHandler for sending packets, you should not use these when modding.  The SimpleChannel is provided for this purpose.

To skip straight to sample code, click here (example 60).

In many cases, you won’t need to create custom packets to keep your client and server code synchronised.  The vanilla code and Forge code do this in a number of ways already:
  • Creation, Removal, Movement, health, actions etc for Entities.  This is accomplished for new Entities by Forge packet EntitySpawnPacket.  You can define a custom handler for this using EntityRegistration.setCustomSpawning().
  • Removal or placement of Blocks
  • Adding DataWatcher variables to your Entity (see here)
  • Containers (Inventory, furnace, etc)
If none of these meet your needs and you need to send custom messages, there are three key components to know about:
  1. Your Message class which represents the message you want to send (for example - a client message to the server might indicate "launch a projectile at location [x,y,z]).  The Message must provides methods to
    * convert the member variables to a serialised format (PacketBuffer) for transmission, and
    * convert the PacketBuffer back to member variables on the receiving side
  2. A MessageHandler class, which is called on the receiving side when your Message arrives for processing
  3. SimpleChannel, which you use to define a channel for your communications as well as to register your Message and MessageHandler.
The Message and MessageHandler are closely coupled.  When registering them with SimpleNetworkWrapper, you need to provide a unique byte ID to identify the message type and its corresponding handler.

The generation, transmission, and receipt of a message (from Client to Server) is illustrated in the diagram below.  Sending a message from Server to Client follows the same pattern.

WARNING! The networking code is multithreaded and your MessageHandler needs to be very careful what it does to avoid crashing the game or introducing subtle, intermittent problems.  See here.


SimpleChannel also provides a number of methods you can use to send messages to the appropriate audience, for example

  • simpleChannel.send(PacketDistributor.PLAYER.with(playerMP), new MyMessage());  // Sending to one player
  • simpleChannel.send(PacketDistributor.TRACKING_CHUNK.with(chunk), new MyMessage()); // Send to all players tracking this chunk
  • simpleChannel.send(PacketDistributor.ALL.noArg(), new MyMessage()); // Sending to all connected players
  • etc

Vanilla Client<-->Server Communication [1.14.4+]

Vanilla communication between the Client and Server sides takes place through Packets, which are sent back and forth using NetHandlerPlayClient and NetHandlerPlayServer.  The basic steps are shown in the diagram below.  There are a large number of different packets used:
* Packets from Client to Server
* Packets from Server to Client
o   Changes to Entities
o   Changes to the World /blocks
o   Managing Graphical User Interface for Containers
o   Miscellaneous


Key points to note

  • Packets sent from Client to Server start with C, for example CPlayerDiggingPacket.
  • Packets sent from Server to Client start with S, for example SUpdateHealthPacket
  • It is possible to create vanilla packets and send them using the NetHandler, however it's almost never necessary.  If you call the correct vanilla methods, they will send the packets for you.  (for example PlayerList.sendMessage() instead of SChatPacket).
  • In order to send your own custom messages between Client and Server, use the SimpleChannel instead of Packets.

Thursday, 12 March 2020

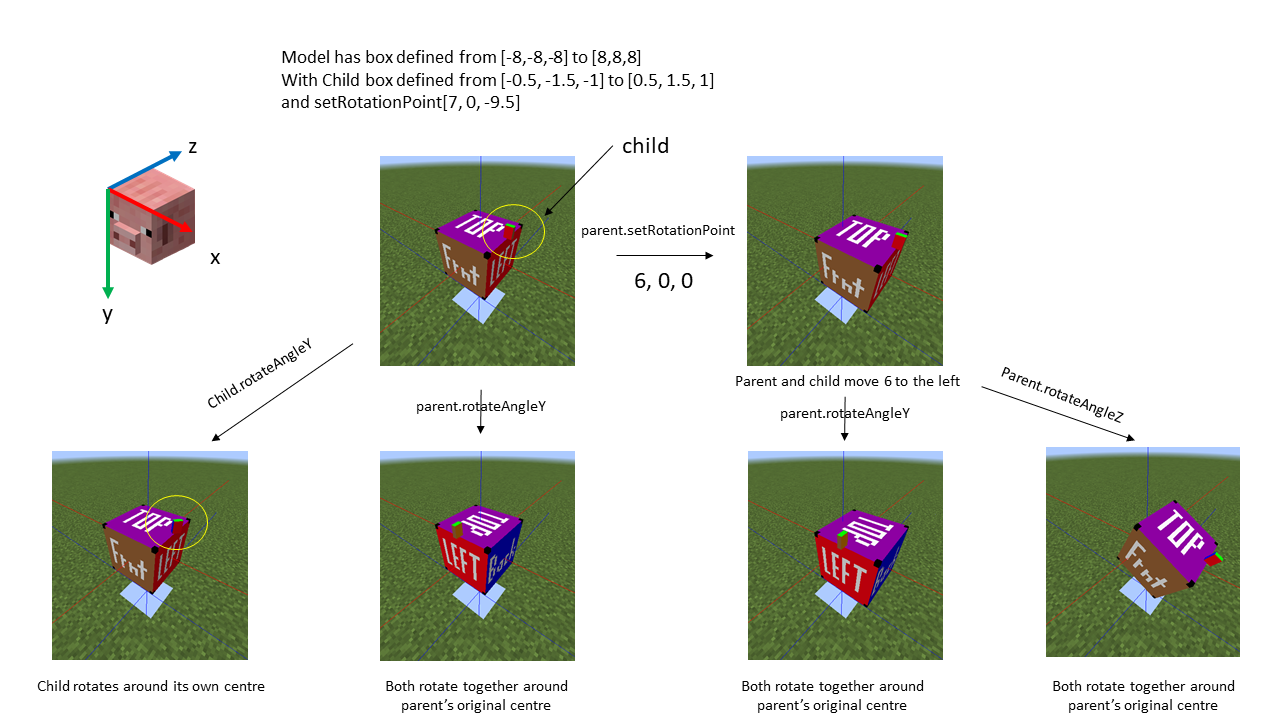
Minecraft Model Basics - Rotation [1.14.4+]


The Renderer for an Entity can use one or more Models, eg head, body, legs.
Each model can be made of multiple boxes (eg the head of a pig has a skull and a snout).
A parent model can also have child models (eg a pig’s head might have ears which can rotate independently of the parent.)


Rotation of the parent model (and children if any) is manipulated using setRotationPoint and rotateAngleXYZ on each model.